Showing posts with label Fire Warrior. Show all posts
Wednesday, March 21, 2012
The Basis of an Army and Delusions of Grandeur
Well, well, well. What do you know. I might actually have a playable army in the coming weeks. Go figure. All it took was...
...not letting myself get carried away with my goals for the future.
Labels:
40K,
army,
camouflage,
Crisis Battlesuit,
Fire Warrior,
Kroot,
Modelling,
Painting,
Tau,
urban,
warhammer
Tuesday, March 6, 2012
First (Minor) Conversion
I had bought some Green Stuff a while back and wanted to practice using it somehow. I wanted to start by filling in gaps on some models, but never really got around to doing it. Thus, I decided to use it on a FireWarrior conversion. Specifically, I wanted to simply use it to adjust an arm position in order to adjust the look a bit.
The model in question was this guy:
Thursday, February 16, 2012
Bases and Setting the Tone
I was originally going to update the previous post with images of the updated bases on my models, but, after performing the updates, I realized that I was stepping into a much larger world I had long forgotten about. After experiencing something for the first time all over again, I wanted to share a bit about that experience .
Thursday, February 9, 2012
Tweaking Bases
Well, I wanted to do some updating to the bases on the Fire Warriors. The camouflage on the Fire Warriors certainly did work with the bases as they were, but they did such a good job of blending in that under low light they hardly looked painted. I aimed to fix that...
Labels:
40K,
bases,
basing,
camouflage,
Devilfish,
Fire Warrior,
Painting,
Tau,
urban,
warhammer
Monday, August 8, 2011
While the Cat is Away....
I've had some trouble with my computer at home the last few weeks. It's needing some new memory. :P I'm back now and wanted to share something that has occurred during the period of incommunicado.
About a year ago, I created a 3D CAD model of a Tau Fire Warrior's pulse rifle:
Labels:
40K,
Fire Warrior,
Miscallaneous,
Pulse Rifle,
Tau,
warhammer
Wednesday, June 8, 2011
Saturday, June 4, 2011
The Three Amigos
So, I went ahead and added the antennas to the helmets and have the three Fire Warriors I have completed thus far ready for combat.Take a look!
As you can also tell, I updated the bases on the first two to match the third.
Like always, comments and questions are welcome!
As you can also tell, I updated the bases on the first two to match the third.
Like always, comments and questions are welcome!
Labels:
40K,
camo,
camouflage,
Fire Warrior,
Painting,
Tau,
urban,
warhammer
Thursday, June 2, 2011
Three's Company...
Well, I mentioned that I put a Fire Warrior on that first base I made. Well, here's the first baseman (Ha! A baseball joke! ...And I don't even like baseball. :\ ).
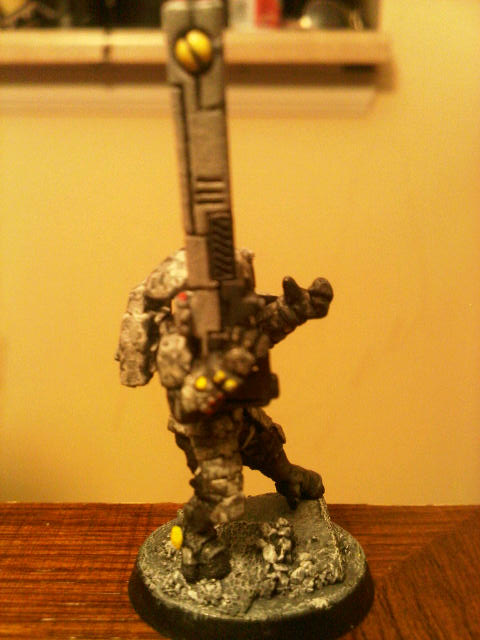
A dynamic fellow indeed. He's weighted on his back foot, looking up the top's of the surrounding buildings... or what's left of them. His gun may be in a non-active position, but that left hand is definitely reaching to meet it or at the very least is ready to support it if the need to return fire arises.
If you're wondering where the antenna normally on the right-hand side of his helmet is... well, its not on yet as I need to add it. I want to get everything else finished on each fire warrior before I pull the antenna off the sprue, as they are easily lost otherwise.
****
This guy is going to hold a special significance for me. Why? Well, he is the first 40K model that is entirely my own. I bought the box, cut him from the sprue, carved the materials for his base, glued him together, and painted it all. It's original me.
I am forever grateful to my friend for sending me his Tau models to get me started (and I have many more of them yet to paint). Those models hold a different meaning for me. One that exemplifies friendship and comradery.
But, this model is the first in something unique. The first of my personal creations. When it is all said and done, I can say this is where I stood on my own and started the journey.
A dynamic fellow indeed. He's weighted on his back foot, looking up the top's of the surrounding buildings... or what's left of them. His gun may be in a non-active position, but that left hand is definitely reaching to meet it or at the very least is ready to support it if the need to return fire arises.
If you're wondering where the antenna normally on the right-hand side of his helmet is... well, its not on yet as I need to add it. I want to get everything else finished on each fire warrior before I pull the antenna off the sprue, as they are easily lost otherwise.
****
This guy is going to hold a special significance for me. Why? Well, he is the first 40K model that is entirely my own. I bought the box, cut him from the sprue, carved the materials for his base, glued him together, and painted it all. It's original me.
I am forever grateful to my friend for sending me his Tau models to get me started (and I have many more of them yet to paint). Those models hold a different meaning for me. One that exemplifies friendship and comradery.
But, this model is the first in something unique. The first of my personal creations. When it is all said and done, I can say this is where I stood on my own and started the journey.
Labels:
40K,
camo,
camouflage,
Fire Warrior,
Painting,
Tau,
urban,
warhammer
Sunday, May 29, 2011
That's Not A Knife...
Well, the other Fire Warrior from my friend's collection that still remained intact with all of its gear was screaming at me to be painted. So, to take a break from the painstaking monotony that is the digi-camo on the 'fish, I obliged.
The Fire Warrior in question was obviously what my friend had intended as the leader of the Fire Warrior team - what with his Bonding Knife and all. So I thought it would be neat to bring his experience to the table (pun definitely intended). He definitely fits the part, braving battle without a helmet!!!
The thing I really wanted to do with a team leader was make it distinct from the rest of its kin. Fortunately, my friend already beat me to the punch. He had built this guy with the helmet-less visage of a Tau warrior, which, to be honest, is nothing spectacular in an of itself... I mean... it is an option provided straight out of the box. But, what was unique was that he had taken a helmet and placed it underneath the warrior's backpack as if it was hanging there ready to be grabbed and slid on his head. I love this little added detail my amigo placed. and wanted to add to the figure's uniqueness.
I added to the models distinction by adding colored areas to its armor to give the illusion of pulling rank. This guy is a leader and everyone should see it, right? Since this army'sdistinctive color is yellow, I added yellow to the shield on the left shoulder, and on the visor on the helmet.
I also went ahead and based this guy and his unit buddy I painted back a year ago.
To base them, I used Fine Cinders ballast from Woodland Scenics for the dark, bare ground and Course Gray ballast for the rocks/rubble. I am definitely going to expand on the basing techniques, but these guys were already o bases and I didn't want to remove them. I bought a box of fire warriors recently, and I'll have some more detailed bases with what looks like city rubble... afterall, this is an urban Tau cadre.
Well, that's it for now. Questions? Comments? Leave them below!!!
The Fire Warrior in question was obviously what my friend had intended as the leader of the Fire Warrior team - what with his Bonding Knife and all. So I thought it would be neat to bring his experience to the table (pun definitely intended). He definitely fits the part, braving battle without a helmet!!!
The thing I really wanted to do with a team leader was make it distinct from the rest of its kin. Fortunately, my friend already beat me to the punch. He had built this guy with the helmet-less visage of a Tau warrior, which, to be honest, is nothing spectacular in an of itself... I mean... it is an option provided straight out of the box. But, what was unique was that he had taken a helmet and placed it underneath the warrior's backpack as if it was hanging there ready to be grabbed and slid on his head. I love this little added detail my amigo placed. and wanted to add to the figure's uniqueness.
I added to the models distinction by adding colored areas to its armor to give the illusion of pulling rank. This guy is a leader and everyone should see it, right? Since this army'sdistinctive color is yellow, I added yellow to the shield on the left shoulder, and on the visor on the helmet.
I also went ahead and based this guy and his unit buddy I painted back a year ago.
To base them, I used Fine Cinders ballast from Woodland Scenics for the dark, bare ground and Course Gray ballast for the rocks/rubble. I am definitely going to expand on the basing techniques, but these guys were already o bases and I didn't want to remove them. I bought a box of fire warriors recently, and I'll have some more detailed bases with what looks like city rubble... afterall, this is an urban Tau cadre.
Well, that's it for now. Questions? Comments? Leave them below!!!
Labels:
40K,
army,
camouflage,
Fire Warrior,
new,
Painting,
urban,
warhammer
Friday, May 14, 2010
My First 40K Figure
So, I promised some images of my the Fire Warrior I painted, which just so happens to be the first 40K model I have ever painetd, and the first model of any kind that I've painted in over 10 years. I also made some reference to the words "urban," "digital," and "camo."
Well, here you go:
I think it turned out pretty well. Not too bad for a guy with a decade of rust.
I sprayed a black base onto the figure using Armory Black Primer. This gave it a nice, smooth coating to paint on, while also giving a nice foundation for the acrylic-based Games Workshop (GW) paints to cling to instead of potentially peeling off of the plastic. The next step was to paint the armor sections and weapon with Astronomican Grey, a GW foundation paint.
*************************************************************************************
At this point I would like to take an aside to mention the Foundation Paints. I must say that they are definitely worth the investment. They give a good coat of paint that can give a better base for different color paints. Because I used a black spray coat to base my model with, any regular paint would need several coats to truly come out as it should. But, the Foundation Paint covers the base with a single application, thus, enabling me to use my lighter colors with single applications. This is great in that you don’t have paint build up filling crevices and small details. The fewer coats you have on a model, the more physical details show through your paint job. Now, back to your regularly scheduled programming.
*************************************************************************************
Once I laid down the Foundation paints, I covered the armor in its base tone of Fortress Grey. This is the lightest of my three grey-tones I was using in my camo scheme, thus it is the base-tone. (To further explain this decision, I’ll post a camo study here in the future.) The next step was to lay my darkest tone in the camouflage scheme. I used Adeptus Battlegrey for this tone. Yes, it is actually a foundation paint, but I liked its scale and contrast with the Fortress Grey. After stippling the dark-tone areas onto the armor (Using the tip of a fine-tipped brush, one-tap-at-a-time. Not the method of using a flayed-bristle brush for multiple, chaotic, less controlled touches… that is not true stippling, that is laziness for the sake of covering more area with less effort. Taking the time to stipple one at a time may be time consuming, but it looks so much better. Trust me. You'll be much more pleased with it.), I then stippled Codex Grey on for the mid-tone.
Once the camouflage pattern was completed, I re-painted the recesses with a with a fine-tipped brush using Adeptus Battlegrey. This gave them more definition, and put a little extra “pop” into the model.
*************************************************************************************
As another aside, I do not use black to paint recessed in a model. That is not the best option. It gives far too great of a contrast in your model than is necessary to convey a shadowy recess. If you want a more natural look to the shadowing, use the darkest tone of whatever color scheme you are using. Using this to fill in the recesses allows the recess to be itself. The dark tone will be further shaded by the recess, giving the appearance of an even darker tone. It is much more pleasing to the eye and can give that extra pop your model needs, while keeping it from looking like an outlined cartoon.
*************************************************************************************
For the garments under the armor, I put a coat of Chaos Black. I painted the “boots” and armor straps Adeptus Battlegrey. I then used the black GW Wash to cover the “boots.”
The weapon casing was painted Fortress Grey while the butt and trigger area were painted Adeptus Battlegrey. I used a base of Gore Red and a highlight of Blood Red on the helmet reticles, and various “glowing” areas of the weapon.
For the “jewels” in various places and Tau symbol on the shoulder plate, I used Sunburst Yellow to make the model stand out and not be completely camouflaged out.
As you can see, I have tried to give the armor a camouflage pattern that appears much like a digital pattern from a distance. Close up, as in these photos, it appears more as small blotches. This is fine, as most of the time, the soldier will be seen from afar anyway.
Let me know what you think!!!
Sunday, May 9, 2010
First Recruit in a New Army
So, I told the peeps I was going to do urban camo for my Fire Warriors... digital looking camo even. Unlike your average Tau urban camo floating around, I will be using only grey-scale. No blues thrown in the mix.
Some were encouraging, seeing it as a cool idea. Others were quick to give a laugh, saying how nye impossible that task would become.
Whatever your position on the idea may be, I've painted one full Fire Warrior. I've finally gotten a replacement camera (Yea!!!), so I'll upload images soon and relay my comments on the process.
For now, here is a teaser image, from a crappy cell phone camera, of an UNFINISHED paint job on the Fire Warrior for my Urban Cadre.
Subscribe to:
Posts (Atom)